| Home | High-End Audio Reviews | Audiophile Show Reports | Partner Mags | Hi-Fi / Music News | |
|
|
Celebrating 30 Years Of Service To Music Lovers |
|
|
|
|
|
|
| ||||||||||
|
The Max Rochlin Memorial Cable™
So, you wanna make a killer 75 Ohm digital cable that schmokes those other guys $300+ offering? How about a high precision 75 Ohm video cable for your video system? Well look no further because what you are about to read will give you all the "tools" you need to make your very own Max Rochlin Memorial Cable™! This cable has already been highly acclaimed by quite a few of my reviewer friends. In fact many of my reviewer friends have this cable in one form or another and are highly satisfied (there have been three generations of this cable by the way). What I'm about to parlay out your way is the newest generation of this highly acclaimed cable. The previous version was being used with quite a bit of praise by reviewers. Those who have tried this newest version all agree it's a step forward and will better illuminate your musical pleasures while being extremely transparent and bettering many other cables available at or below $300 USD on the market today! This cable requires some soldering, though there is a version where no soldering is needed too :-{) . All you have to do is strip wire and crimp if you can not solder two small times in your life. Striping wire, crimping, and soldering are really the only three talents you need. Of course there have been books written on how to properly solder so... To make the full fledged version you will only need to solder twice. TWICE! That's it!!! In the end you will have a cable which will look totally pro, sound/look great, and make you wonder why you even considered spending $100 on a cable, let alone $300! Are you ready? Well, here we go!
Parts Needed 100% cotton pipe cleaner Canare RCA RCAP-C4F or BNC BCP-C4F Added December 2009: For RCA try the Eichmann bullet plug Belden 1505A coax cable *Techflex 1/8-7/16 black mesh *3/4 inch wide by 2 inch long 3:1 heat shrink *Audio Note or Wonder Solder
Tools Needed Wire Stripper, standard $10 to $15 crimping tool for coax cable, scissors *High power hair dryer or heat shrink gun *Good quality soldering gun *optional
Instructions: Ok, first let us get one thing straight here. No matter what you do you must get Caig Pro Gold 5% spray as using the 100% pure Pro Gold is simply too powerful.
First things first. What you need to do is strip off 1/4 inch of the outer conductors leaving only the 1/4 inch of center wire exposed (strip it so that 1/4 inch of the center solid-core copper wire in now bare). Then you can either solder the gold center pin to it alone or for those who choose not to solder. The solder i use is from a friend of mine in the military. Can't buy the stuff, though good results can also be obtained with Audio Note (my fave) or Wonder solder. Now please use the Caig Pro Gold and apply it using the 100% cotton pipe cleaner to the center pin. This not only helps to clean the wire, it also makes it less likely to cause insertion loss, corrosion, and just makes life better in general. Life is good. Music is great. To the next step please and don't hesitate.
Now please strip off 1/2 inch of only the outer plastic cover (red in photo above) so that now a 1/2 inch of braiding is exposed. IMPORTANT: Make sure that there is no braiding or shielding wire touching, soldered, or connected center pin/wire. If so, this causes a short and you will not be happy and neither will the output or input of your components. You have been warned. i wash my hands of all liabilities. If you make this cable wrong and blow something up it is not my responsibility. After making sure the center pin is free and clear with nothing from the outer foil or braid touching the center conductor, please spread only the braid (about 1/4 inch of the 1/2 inch total) leaving the center foil alone and tightly connected to the center white dielectric as shown below. Again making sure that the foil and neither the braid touches the center wire/connector.
Now please apply some Caig DeoxIT GOLD to the center foil, the braiding, and also the inside of either the RCA or BNC connector you are going to use. This helps keep corrosion out, reduces insertion loss, and just makes for a happier connection. When you insert and push the center pin piece onto the outer connector piece you might feel a little "click". Not always, but usually. This means that the center pin has clicked into place properly. You will also notice that the center foil went nicely inside the center piece while the outer braid stayed outside the connector. Please use scissors to cut the excess of the braiding so that it just reaches the connector as shown below. Life is fun, music is grand, you're almost there so strike up the band!
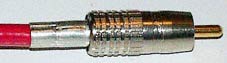
Ok, it's time to slide the crimping ring on, but first use some more of that wonderful Caig DeoxIT Gold on the inside of it too. Now slide the ring on the wire and please make a good solid crimp. After crimping you are now done with side one. Congratulations! It should look like the photo below (for RCA connector).
*Optional is to use Techflex black plastic mesh and heat shrink. Slide on the Techflex until it reaches past the crimp ring but before the connector itself. You can cut the excess Techflex on the non-connectored side to where it reaches the non-terminated wire. With the RCA connector, the 3:1 heat shrink can go over the connector itself. If you are using a BNC connector, the heat shrink will not go over it. This means you will have to only cover the crimp piece itself. Once the Techflex and heat shrink are in place, please use the high-powered hair dryer or heat shrink gun to shrink it over the Techflex. Please see the photos below for what a finished Techflexed and heat shrink connector looks like.
Ok, now it's time for side two. Simply make sure you first put on the crimping ring (with the Caig stuff coated in the inside) before you begin. This way you won't start stripping wire and stuff only to realize that you must put on the tight fitting crimp ring. Please believe me, it is no fun forgetting to put on the crimp ring first. Simply begin like you did with side one if you're not using the Techflex or heat shrink. Once you are done it's party time! All you Techflex/heat shrink folks should please read on. There are some small details i do want to point out. Just some stupid mistakes i've made. The whole Techflex and heat shrink stuff is only for a more visually appealing cable. It has nothing to do with the electrical or functionality of the cable at it all. But hey, it makes the cable look more professional so... When doing the second side all you Techflex/heat shrink folks, please put heat shrink over the Techflex and then slide back the Techflex. Do not shrink the heat shrink until after you have the connector all crimped an' stuff. After sliding the Techflex back with the heat shrink over it, put some of that Caig stuff on the inside of the center crimp ring and put it on the wire as well. Then strip the 1/4 inch of the center conductor and go from there just like we did at the beginning of this project as seen below. Reason is, i have forgotten to do this and it's hard to put on the crimp piece after i have pushed the RCA/BNC piece on.
So there ya have it! If you didn't use the Techflex and/or heat shrink don't worry. It just makes the cable look good. You'd be surprised how ugly some expensive cables are without the Techflex stuff on them!
Steven's comments: First let me say that it takes about 30 minutes to make a cable once you are all set and ready to go. It takes about a week or so for the dielectric to get all good and happily broken in. i personally have a proprietary device which was specifically made to better "form" the dielectric, but music for a week does nicely too. Over the week's time you will notice a smoothing out of the music yet more detail is heard as the week passes. All you video folks will see a bit more depth and small shading details as time goes by. This is one killer video cable too! You should have seen the looks on the cable guys face when he measured my home TV cabling system. He was in awe! Yes, i have tried many different cables by many different companies and this one seems to be the best. Of course you can use the exact same techniques with other cables too. Just please let the record show that i have tried many more cables than any sane person would or should (and who ever said i am sane anyway :-) . Just to give you an idea, this cable is about 83% the speed of light, very, very, very close to a pure 75 Ohm transmitter. It also has so little signal loss it is truly scary! Yes, i have tried many, many other cables and connectors over the past years and this one seems the most well balanced to my ears in my systems. This cable has also been used in super high-end video setups too! i humbly offer this cable for free to all my friends and loyal Enjoy the Music.com™ readers all around the world. May i humbly ask for just a few more moments of your time? Please read the below. Please humor me here. First off the RCA is a horrible connector in general. The "high-end" should be shot for using such junk. Anyone and everyone who deals with precision signal transferring knows the BNC and other gastight-type high-precision connectors are much better (the Camac for example). Worse still are the rubbish female RCA connectors some manufacturers use (and this even includes that $4000+ surround sound processor highly raved about in magazines). C'mon manufacturers, if you are going to use a female RCA please, for God sakes, use the Canare RJ-BCRU, RJ-RU, RJ-BCJR, or RJ-R female RCA 75 ohm connector (ADDED: Please keep in mind this article is well over a decade old, and thus the Eichmann Bullet Plug is a good choice). Specifically, the RJ-R seems to be the best if you use a good quality coax wire from it to the input/output circuitry. Better still, start offering true 75ohm BNC as well as true 75 Ohm RCA as standard. Or eliminate the RCA all together and move the industry forward. The RCA was designed many, many years ago! Show some guts to better the signal transfer integrity (and music) please? Of course directly soldering this wire to both input and output points is better still, yet maybe manufacturers should offer it as a captive wire on only the output device with the BNC or RCA connector on the other end. This way you have a standard of the outputting device uses a captive cable. (Said in good humor) Standardizations... what a concept! Tell ya what, i have decided to allow any and all manufacturers to use this cable as they see fit for free provided that by seeing this article and discovering how good the cable is, they mention it's the Max Rochlin Memorial Cable™ and do not sell it. This cable is dedicated to my brother Max Rochlin who, most unfortunately, passed away due to the HIV virus. Please consider donating a few dollars you would have spent on a more expensive cable to your local hospital for HIV research to help find the cure for the HIV virus? It deeply saddens me to know that many famous folks who have brought the world more joy, through music, have been killed by this still incurable and very deadly disease. A most humble thanks for your time. As always what really matters to me is that you... Enjoy the music, Steven R. Rochlin
|
|